“If you can smoke a slab of ribs, you can cook a whole hog,” says Pat Martin, owner of Martin’s BBQ Joint in Nolensville, Tennessee. Beloved of Bon Appétit staffers (including this one), Martin’s puts out all the classics, from brisket to wet and dry ribs to chicken. So, naturally, we thought Martin himself would be just the guy to give us a beginner’s lesson. (Coming soon: advanced smoking!) In his book, a rack of ribs is 101-level smoking; but if you master it, you can smoke anything—even on your backyard Weber. Here’s how:
THE PREP
1. Slow and Steady, All Day Long
“I know it’s a cliché, but barbecue is something you have to have to be patient with and have fun with,” says Martin. “This is going to take awhile. You need to set aside the day. To me, understanding these things are the first steps to barbecuing.”
2. Get the Right Ribs
“Once upon a time, Chili’s told us that we should love baby backs,” Martin says, referencing that earworm of a jingle. “They’re like filet mignon: Everyone thinks it’s the best cut. But in reality, it’s tasteless. Frankly, baby backs are no more tender than spare ribs, and spare ribs have far more flavor. My recommendation is to use spare ribs. Trust me.” Martin recommends getting a three-pound St. Louis cut slab of spare ribs.
3. Get the Right Wood
Martin likes hickory chunks—”they’ll smolder, and are less likely to flare up than chips”—but if you can’t find chunks, chips that have been soaked for at least an hour will work just fine. In terms of wood, you should look for hickory, apple, cherry, or oak, and stay away from mesquite, which has an extremely pungent flavor (for more on wood types to use, see here). “Don’t even think about sap woods like pine—they’ll absolutely ruin your food, not to mention that they’re slightly toxic.” Noted!
4. Start Your Coals
Just like many of the grilling greats have told us before, Martin warns against using lighter fluid or charcoal that’s been impregnated with lighter fluid. “Use either high-quality briquettes or lump charcoal,” he says. An important part of smoking meat is keeping an arsenal of lit coals at your disposal to keep your smoker or grill at a constant temperature. “We’re not going to put raw coals in the smoker. You need something going on to the side, maybe another grill, full of burning coals.” The best way to do this is a chimney starter. Martin recommends Weber’s model. “Once you get those coals ready, you can just add raw coals to the chimney. You don’t need to start the fire again. You have a small fire that’s going continuously for seven hours. It’s convenient—if you need coals, they’re there.”
5. It’s All About the Rub
Martin isn’t a fan of brine: ”You’re gonna use a rub, and if you don’t use a rub, you’re gonna use just kosher salt and black pepper. If you brine it as well, you run the risk of making the ribs too salty. You don’t need to brine. If you’re gonna cook it low and slow enough, you’re gonna let the collagen inside that meat do its job—it’ll break down and become gelatinous, which creates that silky texture that we all ooh and ah about.” The pitmaster’s rub is simple: 1/2 cup kosher salt, 1/2 cup brown sugar, 1 tablespoon of lemon pepper, 1 tablespoon of black pepper, and 2 teaspoons chile flakes. Take all that sweet, salty, spicy goodness, and cover your ribs with it. Then you’re ready to fire up your grill.
THE SMOKE
1. Know Your Anatomy
You’re smoking meat for the first time—so you probably don’t have a smoker (yet). Martin suggests using a good ol’ charcoal grill. The only difference here is that you might only be able to fit one slab of ribs instead of two. This is how you’ll do it: Open your grill’s bottom damper, then pile lit coals on top of it, keeping all the coals on one side of the grill. ”Slowly add the coals until it gets up to 250 degrees—the hottest your smoker or grill should ever get,” says Martin. “If you don’t have a temperature gauge on your grill, buy a $15 laser heat gun and use that. Personally, I don’t use a temperature gauge at all. There is some credence to doing the Mississippi method: If you can hold your hand above the coals for three ‘Mississippi’ seconds, you need to add some more coals. If you can’t hold it there for more than two seconds, it’s almost too hot. You need two Mississippis.” Then put wood on top of the coals.
2. Not Too Hot, Not Too Cold
After you’ve gotten your grill to 250 degrees, replace the grate, lay your ribs on the opposite side of the coals, then put your grill’s lid on, making sure to put the lid’s open damper right above the meat. “The opposite position of the dampers will create a small vacuum and helps push oxygen though the coals to keep them going. It’ll also pass the heat directly through the meat,” explains Martin. And now you’re smoking!
“We’re shocking the cold off of the ribs once they get into the smoker. Once you put those two slabs of ribs in there, they’re going to rob your smoker of heat. It’ll level out around 220.” That’s the big reason you want to start just a little bit hotter, since those ribs will pull that temperature down. Here’s the deal: You can always add heat, but it’s very difficult to take it away. “Try to maintain a temperature of 220 degrees. It’s not a perfect science, but you have to sit there and watch it. Every 30 to 45 minutes you’re going to have to add coals. But that’s fine! That’s the point of barbecue.”
3. Don’t Touch!
“Some people like to use a spray gun to moisten the meat, but that’s bullshit,” says Martin. “You’re not gonna open that lid. I don’t flip my ribs. You’re cooking with an indirect heat, not cooking directly above a fire, so you don’t need to flip them. There’s no point in looking at the ribs. That won’t do anything but hurt you. Just keep the lid down, and manage your coals and your temp.” If you’re using a grill and not a smoker, however, you’ll have to open the lid to refill the coals. Just remove the meat and the grate with oven mitts, put in your hot coals, replace the grate and the meat, then quickly close the lid.
4. Four Hours Later…
In about four hours, it’s time to open the lid. “The meat should be pulling pack from the bones a little bit,” says Martin. “Using an oven mitt, lay your hand flat, and put one of those slabs of ribs on your mitt. If the ends of the slab of ribs bounce when you move your hand up and down, they need more time—probably another hour. If you hold them up and the slab starts to split apart and break in the middle, you’ve overcooked them. Which is okay. Nobody is going to complain. Ideally, though, you want to see them a little limp, but not wanting to break apart.” Smoking is all about creating a silky texture by breaking down the collagen in the meat—you’ll be able to tell if that collagen has done its job by the meat’s jiggle.
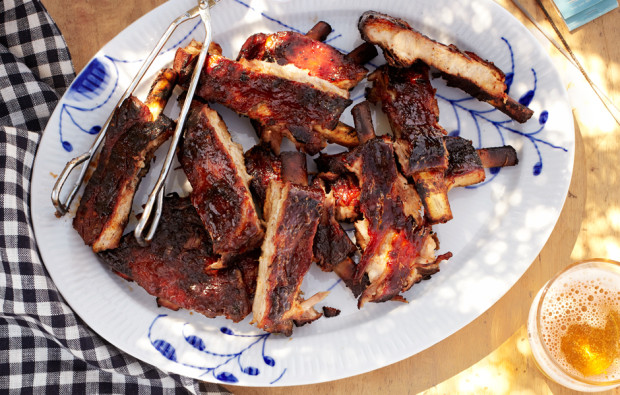
5. The Finish
Don’t serve those ribs dry! “When they’re done, get your barbecue sauce and glaze those ribs over. You can either set them over direct heat on the grill, or sauce them and put them back to smoke for 15 to 20 minutes, and let that sauce bake onto the ribs. Then they’re done.” The best part about ribs, according to Martin? “When they’re done, they’re done. There’s no resting or anything. Just put them out on a platter, cut them in twos or threes—don’t cut them into individual bones because that’s a mess and just pisses people off. And that’s it.” All you have to do is wrangle your six to eight hungriest friends and some wet naps, then dig in.
JUNE 18, 2014 / WRITTEN BY DANIELLE WALSH